History of the Atlantic Cable & Undersea Communications
from the first submarine cable of 1850 to the worldwide fiber optic network
Instructional Case - Method of Jointing
|
History of the Atlantic Cable & Undersea Communications |
|
Instructional Case - Method of Jointing |
|
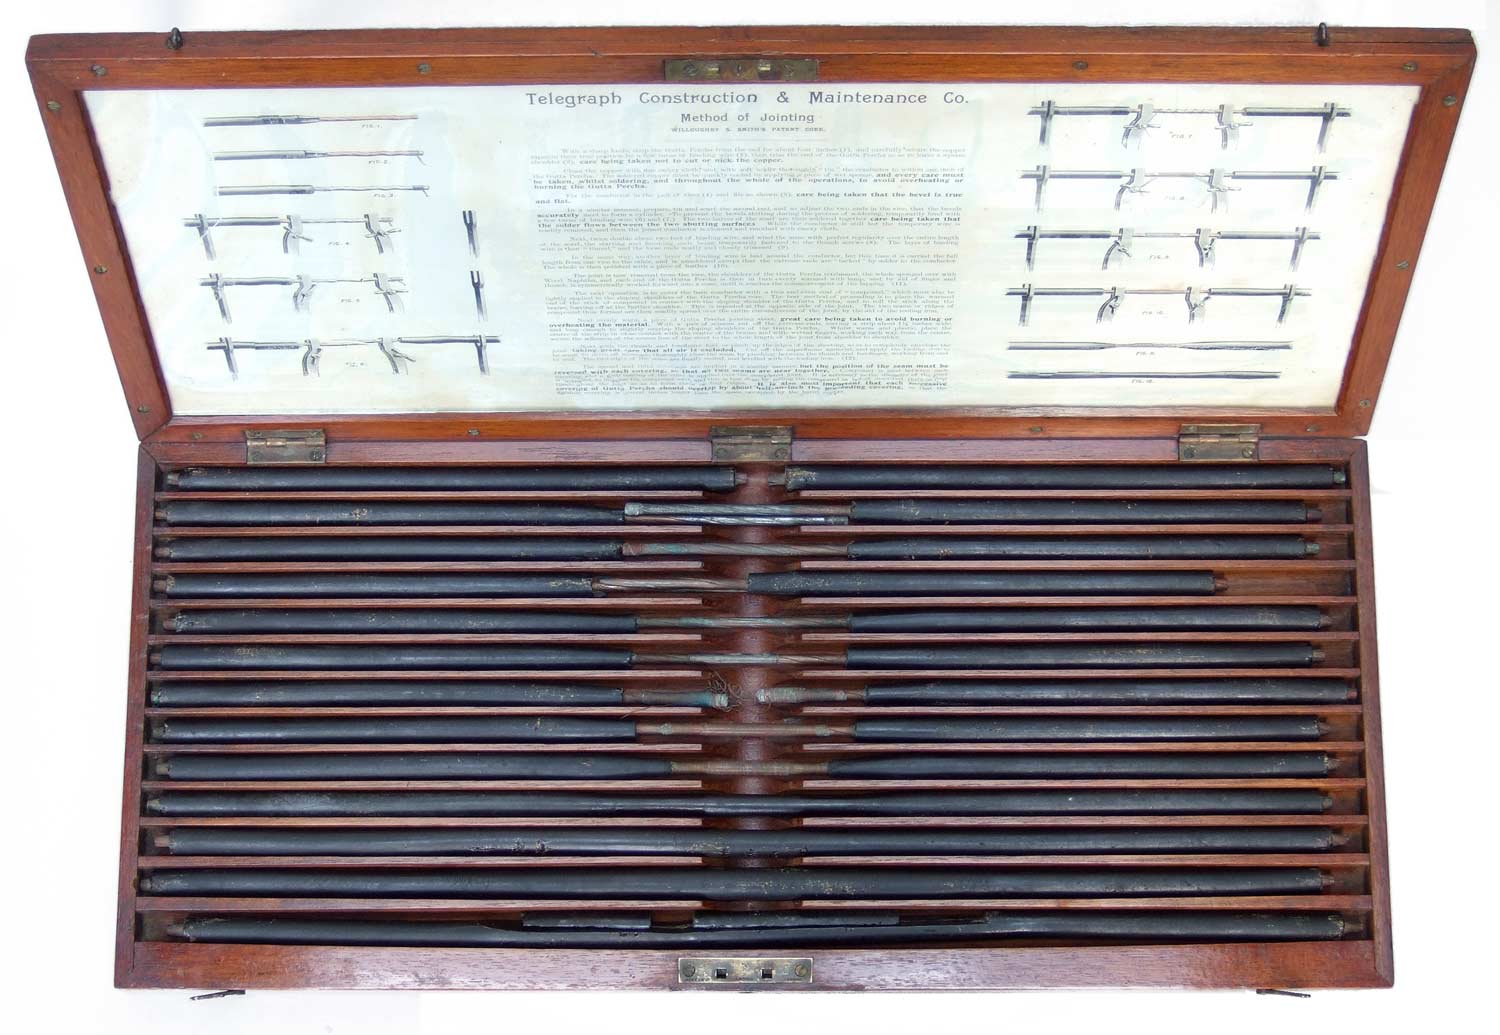
During a cable laying expedition, the cable jointer's job is one of the most important technical positions on board ship, as a defective joint may compromise the entire cable. A chapter in an 1896 cable engineering textbook, reproduced elsewhere on the site, showed the techniques and explained the details of how to make a successful joint in a copper conductor insulated with gutta percha, but the Telegraph Construction & Maintenance Company (Telcon) evidently felt the need for something beyond written instructions. This small instructional case (which appeared at an auction in Glasgow in 2013) contains thirteen core sections of a standard Telcon cable of the 1880s/1890s, each carefully prepared to show one of the steps in making a sound joint. Behind glass in the lid of the case are illustrations and instructions for each step. A brass plaque on the lid is engraved "SS Great Northern", so perhaps one such case was issued by the company to each cable ship. CS Great Northern was purchased by Telcon in 1879, based at Zanzibar, and used for cable maintenance until she was wrecked in 1902. Note:
The label also carries a 1933 accession number and was presumably created at that time. The date of the case itself is not verified, although the copper conductor does appear to have the six around one arrangement used on the 1866 cable. The full instruction sheet mounted inside the lid of the Great Northern box is shown below. I have also transcribed the text, inserted the illustrations in the appropriate places, and included images of the actual core samples in the case.
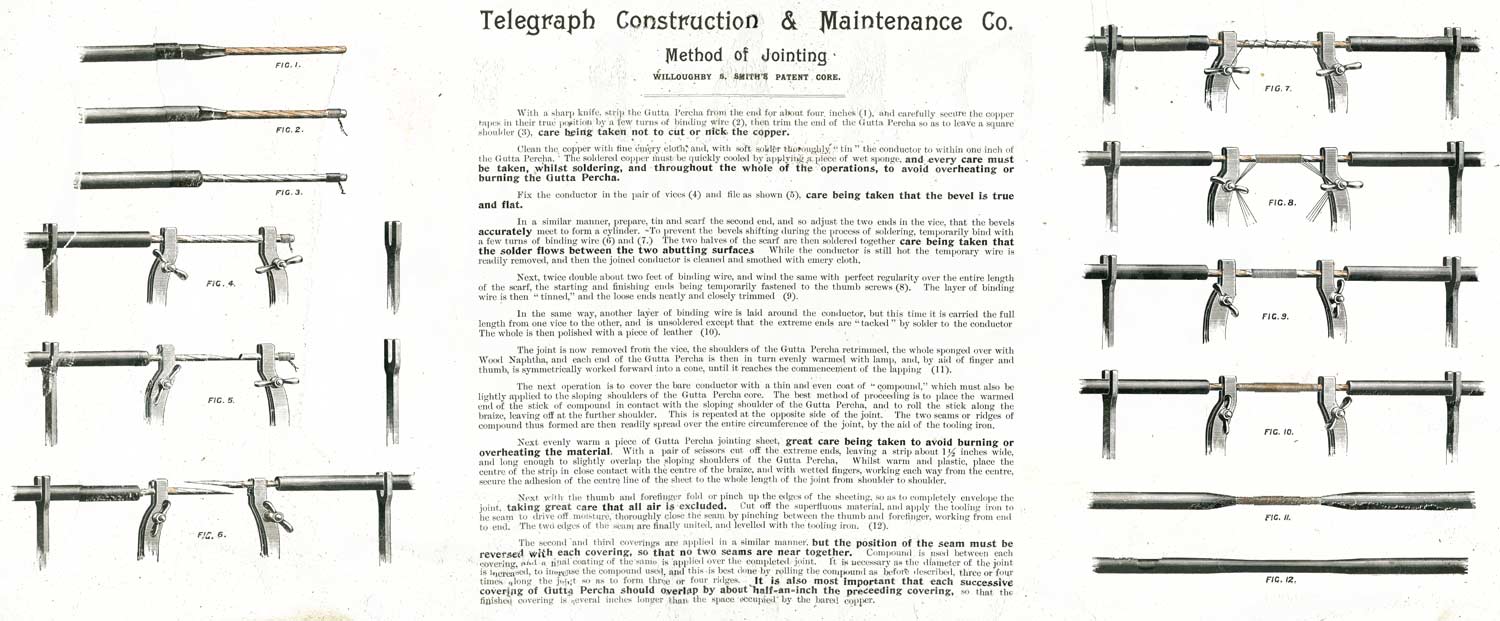
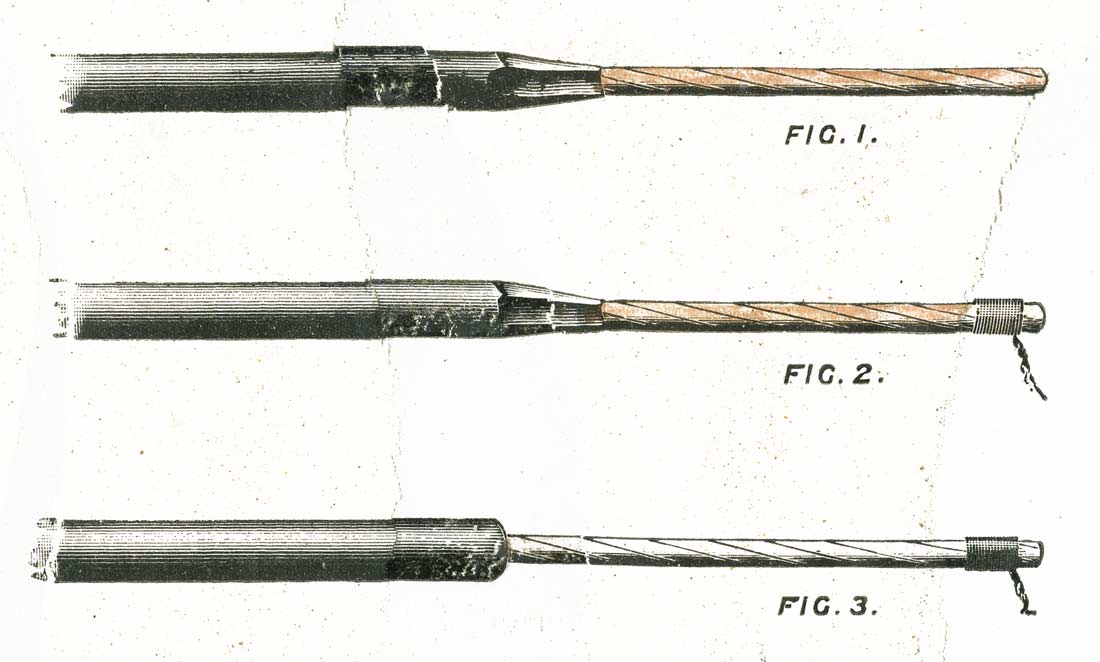
With a sharp knife, strip the Gutta Percha from the end for about four inches (1), and carefully secure the copper tapes in their true position by a few turns of binding wire (2), then trim the end of the Gutta Percha so as to leave a square shoulder (3), care being taken not to cut or nick the copper.
Clean the copper with fine emery cloth, and with soft solder thoroughly “tin” the conductor to within one inch of the Gutta Percha. The soldered copper must be quickly cooled by applying a piece of wet sponge, and every care must be taken, whilst soldering, and throughout the whole of the operations, to avoid overheating or burning the Gutta Percha.
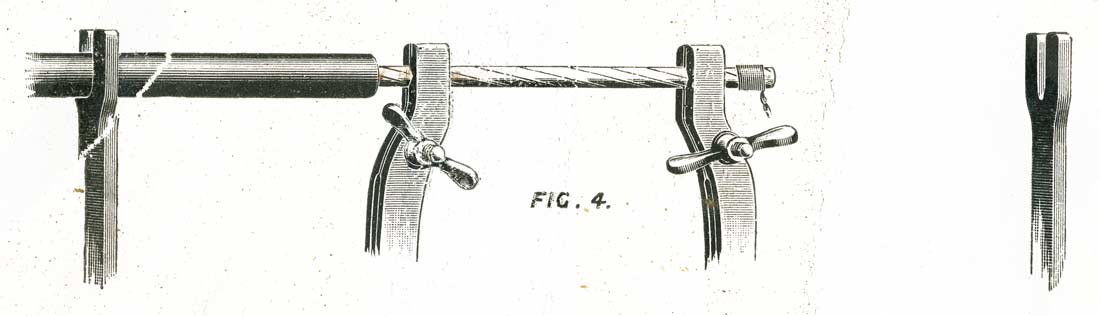
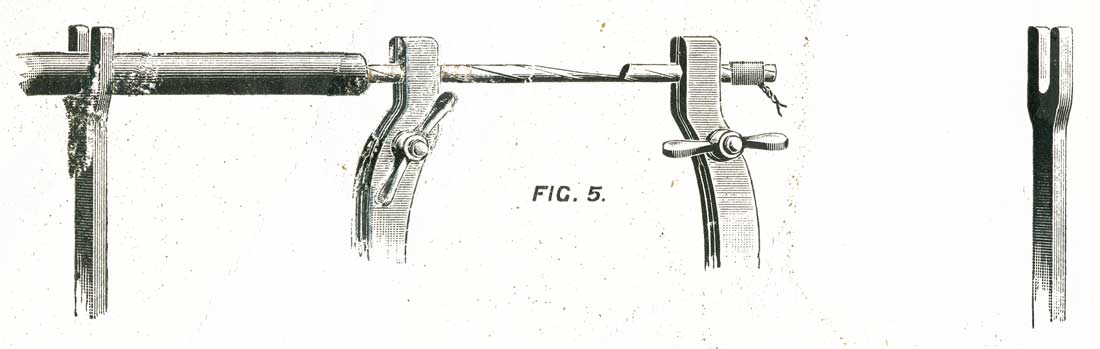
Fix the conductor in the pair of vices (4) and file as shown (5), care being taken that the bevel is true and flat.
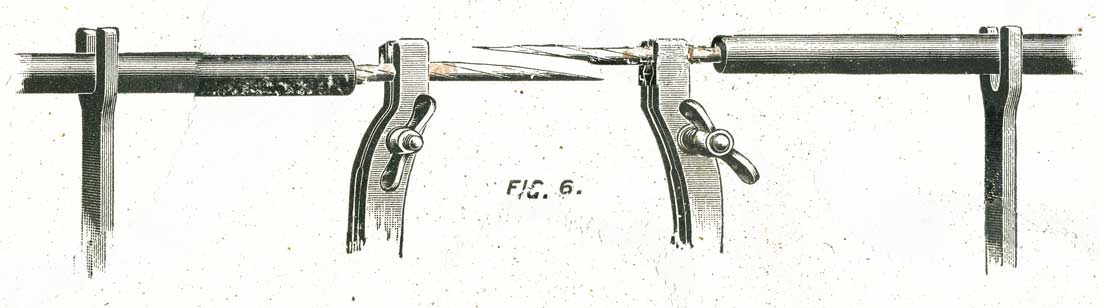
In a similar manner, prepare, tin and scarf the second end, and so adjust the two ends in the vice, that the bevels accurately meet to form a cylinder. To prevent the bevels shifting during the process of soldering, temporarily bind with a few turns of binding wire (6) and (7.) The two halves of the scarf are then soldered together, care being taken that the solder flows between the two abutting surfaces. While the conductor is still hot the temporary wire is readily removed, and then the joined conductor is cleaned and smoothed with emery cloth.
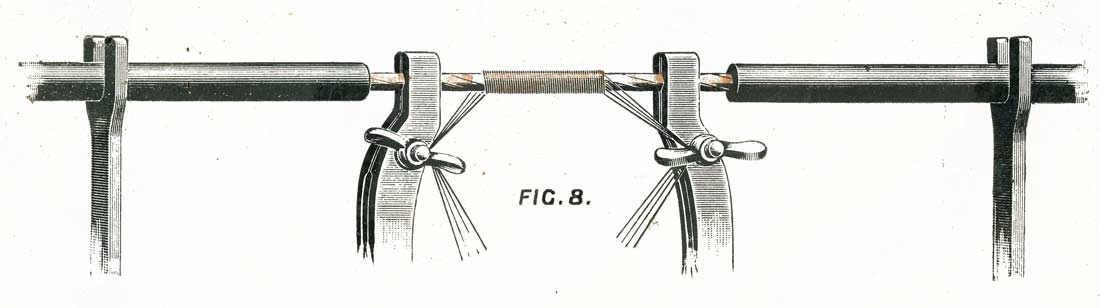
Next, twice double about two feet of binding wire, and wind the same with perfect regularity over the entire length of the scarf, the starting and finishing ends being temporarily fastened to the thumb screws (8). The layer of binding wire is then “tinned,” and the loose ends neatly and closely trimmed (9).
In the same way, another layer of binding wire is laid around the conductor, but this time it is carried the full length from one vice to the other, and is unsoldered except that the extreme ends are “tacked” by solder to the conductor. The whole is then polished with a piece of leather (10).
The joint is now removed from the vice, the shoulders of the Gutta Percha retrimmed, the whole sponged over with Wood Naphtha, and each end of the Gutta Percha is then in turn evenly warmed with lamp, and, by aid of finger and thumb, is symmetrically worked forward into a cone, until it reaches the commencement of the lapping (11).
The next operation is to cover the bare conductor with a thin and even coat of “compound,” which must also be lightly applied to the sloping shoulders of the Gutta Percha core. The best method of proceeding is to place the warmed end of the stick of compound in contact with the sloping shoulder of the Gutta Percha, and to roll the stick along the braize, leaving off at the further shoulder. This is repeated at the opposite side of the joint. The two seams or ridges of compound thus formed are then readily spread over the entire circumference of the joint, by the aid of the tooling iron. Next evenly warm a piece of Gutta Percha jointing sheet, great care being taken to avoid burning or overheating the material. With a pair of scissors cut off the extreme ends, leaving a strip about 1½ inches wide, and long enough to slightly overlap the sloping shoulders of the Gutta Percha. Whilst warm and plastic, place the centre of the strip in close contact with the centre of the braize, and with wetted fingers, working each way from the centre, secure the adhesion of the centre line of the sheet to the whole length of the joint from shoulder to shoulder. Next with the thumb and forefinger fold or pinch up the edges of the sheeting, so as to completely envelope the joint, taking great care that all air is excluded. Cut off the superfluous material, and apply the tooling iron to the seam to drive off moisture, thoroughly close the seam by pinching between the thumb and forefinger, working from end to end. The two edges of the seam are finally united, and levelled with the tooling iron. (12).
The second and third coverings are applied in a similar manner; but the position of the seam must be reversed with each covering, so that no two seams are near together. Compound is used between each covering, and a final coating of the same is applied over the completed, joint. It is necessary as the diameter of the joint is increased, to increase the compound used, and this is best done by rolling the compound as before described, three or four times along the joint so as to form three or four ridges. It is also most important that each successive covering of Gutta Percha should overlap by about half-an-inch the preceding covering, so that the finished covering is several inches longer than the space occupied by the bared copper.
|
|
Last revised: 18 September, 2022 |
|